Monday, November 24, 2008

Girl time

It's been a long time since the high school gal pals got together for a weekend! Finally our time arrived. Our drive up island included a couple of shopping stops in Cobble Hill and Whippletree Junction, which can only be described as perfectly delightful.


The purchase, even more so:


The final destination, Tigh-na-mara, was idyllic:


Same time next year!

Monday, October 27, 2008

Quilted!

For about a year now, I have been wanting to finish a few quilting projects, but my yarn always seemed to get in the way of my fabric progress. Well, I have finally done it, yay me!

I present Maiko, a Cloth Shop design:


I am planning to have this quilt grace my bedroom wall, I am very excited about it! This was a kit supplied as a sixteen-block quilt, but I wanted the dimensions to be closer to a 12 block size in a 3x4 format (finished size about 50 x 60 inches). I had leftovers, of course, and could not let these beautiful fabrics go to waste, so I whipped up a four block size, too:


Some detail of stippling in the background of the stars:


Fits quite nicely in our living room!


And the next one up is Vintage Gatherings, from the same place:


It was a block-of-the-month project in 2006, which I had great fun in piecing and appliqueing over the course of nine months. Once I had the quilt top done, it sat for a long time before I felt inclined to continue. Our cool weather helped immensely! I got started, then couldn't stop (what's new). More detail of the stippling, my all-time favourite and effective quilting technique.


This section of the block needed a little extra something something. I took inspiration from nature:


Liking this!


The finished size is about 54 x 58 inches. You will have noticed I have not quilted the border yet, I am still thinking about design. I'm considering it finished, though, and eventually when it is hung as wall art, I will complete the quilting!


A few years ago I made a special quilt from reproduction fabrics of the early 1900s. There were enough leftovers from that to make a small 30" x 30" wall quilt - I chose the Snowball design, a vintage pattern.


I have just finished it, and it now hangs in our sewing room/office.


I am feeling pretty good about life right now...

Friday, October 17, 2008

Resistance is futile

I know I said I was trying to not buy new yarn, distractions and all, but I couldn't help myself. Another weak moment in my day and I came home with some Noro Silk Garden Chunky! Not surprisingly this didn't sit for long before getting knit up into the Anthropologie-Inspired Capelet, from Peony Knits (free pattern).

Knit on a 7 mm circ, less than 24 hours folks!


I saw a store sample here and was immediately captivated by it, not to mention it fit me perfectly! I got a gauge of 13.5 sts/10 cm using this yarn, so I cast on more sts than what the pattern called for.

I cast on 61 sts divided as follows: 10 for left front, 10 for left sleeve, 20 for back, 10 for right sleeve, and 11 for right front.

This means for row 1 (the set-up row), I did this: k2, p8, yo, pm, p1, yo, p9, yo, pm, p1, yo, p19, yo, pm, p1, yo, p9, yo, pm, p1, yo, p8, k2.

I continued raglan increases 14 times which is what it took for the sleeve section to be the circumference of my upper arm (11 inches). The sleeves had 38 sts (each, of course) at the time of making the divide from the body.

On the wrong side rows where you knit all the sts, I knit the yo through the back loop to lessen the eyelet hole which I like but not quite so big. Three skeins were used to make this pretty capelet, I really like it!

Monday, October 13, 2008

Toques and tea

Tray of hats, to admire, to squish, to wear!


Some leftovers of the above hats using Noro were used up in this Kureyon Kozy. My tea cosy is a combination of Silk Garden, Kureyon, Taiyo, and Iro. Most pleased was I to use up every little last bit I had of these. Easy pattern, with only a couple of modifications: I shortened the repeats of the top so I would have easier access to the lid, and I just crocheted a chain (using the Iro) to tie bow-style above the handle.


See that quilt-in-progress on the table behind the cosy? It is almost finished and I'm trying hard not to buy any new yarn to avoid any distractions. After it's done, I have another one waiting in the quilting queue, here is what one of the blocks looks like:


Busy times! :o)

Saturday, October 11, 2008

Improved with I-cord

Remember these?


A wee bit plain, so I thought I'd jazz them up a bit with some leftover Koigu Kersti! I used 3 stitch I-cord to make a length, then sewed it down with regular sewing thread into this flower shape. A visit to the button jar, and we're done!


Now they really are "Super" Mittens!


In my last post I was proudly sporting Juliet. In the few times I have worn it since, I have not been happy with the loop closures. Specifically, I thought the attachment of the loops seemed kind of sloppy, and showed through the knit fabric. It was Sivia Harding who suggested to me I do applied I-cord all the way up the fronts and around the neckline to create a smooth finished front, and seamless I-cord loops for the buttons. Brilliant idea! Thanks Sivia!

Sunday, September 28, 2008

Juliet

My newest addition to my fall wardrobe: Juliet. (I am slowly but successfully replacing all my store-bought sweaters with my own handmades, except for the golf sweaters, of course, but hey, I think I may try knitting argyle next...)


I had bought some Cascade Ecological Wool for another project in mind, but the gauge would not work. Then I remembered Juliet used a bulky weight, so off I went. Worked on 6.5 mm needles, this was truly a fast and easy knit with no major modifications.


After casting off the sleeves, I worked the garter section for 4.5 inches before beginning the lace. I went into the second skein near the end of the 7th repeat. I completed eight pattern repeats, then went on to four rows of garter stitch, and then cast off purlwise.


Found these fabulous buttons here, the selection was so amazing, it took me an hour in the shop to decide which to choose. I spaced them evenly, and staggered like in the pattern photo for some whimsy. For the closures, I did two stitch I-cord, and sewed them opposite. It's very easy to wear, my new favourite!

Saturday, September 20, 2008

Back to School U-neck Vest

I love going back to school - especially the fall clothes! Here's the other vest I had planned this year, from Stefanie Japel's Fitted Knits. This vest I knit from Aslan Trends Ecolana (alpaca 60%, merino 40%) in a very dark brown, on a 4 mm circular needle. I like this stuff, no dyes or chemicals used, soft and so light. A little itchy, but I think I can handle it!


I think there may have been an omission in the pattern where, after the ribbing section is finished (working from the bottom up), there should be a "knit 1 round" before beginning the purl 3 rounds, knit 3 rounds, etc. This would better define the purl band. I'm not sure why I didn't just do it, since that's how it's written before starting the ribbing. I would definitely recommend including that row.

There are errata for this pattern, I'm glad I noticed it before things got bad. Plus, I made a few mods myself. Like many other folks on ravelry, I wanted the neck to be a bit lower, and the shoulders to be a little narrower. The following modifications take into account the designer's errata, for the size I knit (the smallest)


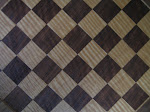
Body
I worked even in waffle stitch til body measured 14” (obviously for longer length)

Upper front
After decreasing 1 st at beg of next 12 rows, I worked only one row (instead of 7, for a lower neck)

Front neck
Row 2: bind off 24 sts, work to end (22 sts remaining)

Note: all decreases occur at NECK edge
Row 4: decrease 1 st, then decrease 1 st every 4th row 3 times more (18 sts). Thereafter, decrease 1 st every 3rd row for 6 times (12 sts)

At this point you will have done the required number of repeats of rows 4-13 as per patt, plus one row (consider it negligible)

Next two rows: decrease 1 st at neck edge (10 sts, for a narrower shoulder width, taking into acct that purl bands will add a little more width)

Upper back
I wanted the rate of decreases to match the fronts, hence: decrease 1 st at beg of next 12 rows (44 sts)

Back neck
Repeat rows 3-4 six more times (10 sts)

Finishing
For the armholes, I only purled three rounds, then bound off purlwise. This helped narrow the shoulders a little more.

I’m happy with it! Another fall vest finished, and I got away with just (we’re talking less than 5 metres) two skeins.

Saturday, September 6, 2008

Wool Peddler's Shawl

All done - and getting lots of use already, is my version of Cheryl Oberle's Wool Peddler's Shawl from her book Folk Shawls. Starting from the top down, it's knitting on easy street with rows and rows of garter stitch on a 3.75 mm circular needle. Five different colourways of Koigu PPPM were used, just like the ones I've seen before. The next colour was introduced in alternating rows with the working colour until the working colour was used up.

After getting suitably bored with knitting every stitch, the lace section was pretty exciting to begin. I started my lace when I had 331 stitches on the needle, that is, 165 sts on either side of the centre stitch. The pattern gives you a chart and written row instructions for this part. I always wish I could follow charts, but usually I find it easy to go through the row by row instructions. Not this time! With all my stitch markers in place to increase around the centre stitch, I found that the instructions omitted "sl m," which led to problems the first go-around. So this is how I re-wrote it:

On the odd row instructions where the designer says to repeat the lace pattern "from * to 1 st before next marker," I worked the next stitch as per instructed, THEN I slipped the marker and carried on ie. on row 1: K1, yo, knit to marker, *k1, yo, k3, (sl 1, k2tog, psso), k3, yo; repeat from * to 1 st before next marker, k1, sl m, yo, knit centre st, yo, sl m, repeat from * to 1 st before next marker, end k1, knit to last st, yo, k1. On even rows, the markers are slipped on either side of the purl stitches. Once that was resolved, it was back to easy street! I even had the pattern memorised by the end of the lace.

While on the last colour, I was mostly stressed about not having enough to finish the pattern repeat, and then completing eight rows of garter stitch before casting off. Since the shawl was getting bigger and bigger with each row, my estimate of how much yarn I needed for a row was pretty weak by shawl end. I did in fact guess wrong, and ended up doing only six rows before the cast off (which I did purlwise so that it would look like another row). I think it turned out alright! It has a very nice weight to it and the delicate edging just totally makes it.

Here it is pre-blocked


and being blocked


and the completed shawl


as worn by miss M:


Wednesday, August 27, 2008

Progress of the Shawl

My summer shawl project is made of this:


So far, it's looking like this!


Friday, August 15, 2008

Summer Production, second set

Got back from another mountain holiday...here are a few results!

First up is the Checkerboard and Rib NeckWarmer from Christa Giles. I used Brown Sheep Lamb's Pride Bulky in Cranberry Swirl, one skein. Gauge is 3 sts per inch on 6.5 mm needles, a rather gratifying knit! This I completed in a few hours while watching the news of the rock slide which delayed our departure to Whistler. It was supposed to be my knitting project in the car! This yarn is a little scratchy on the neck, so I may look for some thin fleece to line it with. I like it on my bear, he wears it like a cape.


The buttonhole is pretty big and needed a toggle shape type of closure. This beautiful wood button (handmade by Joe I've had for awhile now, it's just been waiting for the right object to embellish. Done! I love this, it looks very Canadiana with the red and maple together.


While in the Rockies last month I picked up a skein of Lonesome Stone's alpaca worsted (90% alpaca, 10% merino). The farm where the yarn is produced is in a neighbouring town to our family cabin...I like the thought of using a locally made product. The colourway is midnight forest, and the wool itself is very light and airy. I had 200 yards, but I wanted to just make a hat with it. I found a free pattern on ravelry to use, and made most of this from Hope to Pemberton. Cast off that night for another one-day knit. I'm very pleased with the colour distribution, and I have lots left for my stash.


Quite some time ago I received some Artyarns Supermerino from Fabulous Yarn. My first project with it did not turn out well due to dye lot discrepancies. The girls at Fabulous Yarn were so great with my request to exchange it despite it being "used" and wound in balls. I got a full replacement. This time I looked on ravelry to see what people were making with this yarn, and most were knitting socks. Well, that suited me fine, I love socks!


Yet another pattern from Cat Bordhi, this is the Philosopher's House Socks pattern from the same book I've been using of hers, done in the "Upstream Sockitecture." One skein (104 yards) per sock, colourway dusty purple, superwash merino wool, 5 sts per inch on 3.75 mm needles. They were a no brainer, perfect gauge and fit, soft and comfortable. I repeated the last two pattern sections so that I could use up a little more of the yarn. A complete success!

Thursday, August 14, 2008