Friday, December 24, 2010

Thursday, December 23, 2010

It's all good

New teapot....


needs a new tea cosy! Well, how many cosies can a teapot wear?


And here I go using up some vintage ric-rac!


A trip to the Cloth Shop supplied me with loads of inspiration to get the ball rolling, so much so that I made these three in as many days. Two to gift, one to keep, I'm thinking. Here we are, modelling near the tree to get into the spirit.


Carrying on with the same colourful note, miss M was inspired by a picture she saw on the internet of felted acorns. Our big oak tree was very generous this year with its seeds, dropping many acorns in doubles and triples, a bonus for the artist. Marianna set about collecting them and choosing her rovings. Here are the little gems newly created by miss M, a wee gift of handmade needle-felted goodness.

Tuesday, December 21, 2010

Hat Parade

Went a bit crazy with hats again this fall.
One leads to another, to another...kind of like eating chips.

These have all been gifted! (or kept to ourselves....)

Knotty but Nice was a great way to exercise my hands making cables. I got lots of practice cabling without a cable needle, makes me feel so pro.


I love making Christa Giles' hat patterns, Tilted is one of my favourites which I've modified slightly to give it more slouch factor. Christa can also be found here on ravelry. These two I made back to back, using my usual model, plus cousin!


Ysolda Teague's Ripley has been on my mind since Whimsical Little Knits 2 came out. Another fun slouch with a bit of lace!


This is the second Sutro Heights I've made, using alpaca from our summer hols in Colorado. Still loving slouch and lace.


Then to keep things interesting, miss M asked me to kindly whip up a hat with cables, earflaps, and braids, if I had time.
Apparently, I had time! This is it.

Monday, December 20, 2010

Eve of Winter Solstice

Just squeezing in some of my favourite fall pictures from around the yard this season!

Wednesday, November 17, 2010

That's just jim Dandy

It was one of those moments where I lost control in the excitement of meeting yarn designer and textiles artist extraordinaire Kaffe Fassett. Splendid chap! I wasn't really planning on buying that night, but oh well. I'm weak.

Four skeins and a pattern book later, I whipped up another little something....you know, for warmth.

Here's Dandy, a Sarah Hatton design, using Kaffe Fassett's Rowan Colourscape yarn in Chunky, 100% lambswool, colourway Misty. Modelled by Andrea W.


It has a very loose fit with no shaping, and not a sweater design I would normally be drawn to. But it was fun! The 6.5 mm needles really got the job done in a hurry.

After consulting with Anina (who made the same sweater in two days, ahem), I decided to make the body a little smaller by reducing the number of front edging sts to 11 from 13. Also, when I pieced the fronts to the back, I used a 2 st seam allowance on the back instead of the usual 1, when mattress stitching.

I blocked the pieces before starting to piece them together. It makes the seaming experience SO much more enjoyable. Here they are, all dry and ready to be joined.


After knitting the edgings, the pattern says to sew them to the front piece, without specific instruction. I began using the working yarn in a mattress stitch style, but I didn't like the seam. I thought it was a bit thick. I was not convinced a good blocking would remove that pucker created at the starting point.


So after a bit of thought, I chose to use three strands of embroidery floss in a neutral colour, with small invisible stitches on the wrong side.


Here's the right side, edging attached. This works for me, it's so flat! And I love the colour contrasts.


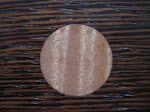
Pretty stained wood buttons are from Button Button.

Friday, November 12, 2010

Like mother

Months before her birthday this past summer, miss M had an IDEA. She wanted to create and make a small stuffed critter for each of her birthday guests, personalising each one a bit for each friend. She drew out a rough plan:


She wanted me to help her with the supplies and sewing. I encouraged her to use as much as possible from what I had already in my crafty stash, staying with my philosophy of using what we have on hand before acquiring (too much) more.

She did the planning of materials, pattern making, cutting, gluing, embroidery, and stuffing. I was only needed to work the machine when called upon.

We started them in about March (the party was in June), allowing ourselves to enjoy watching them being born one at a time! Careful thought was given to fabric choice (as much as possible within the supply) and expressions for each birthday friend, slowing giving personality to the stuffie. She named each one, wrote bios for each with their dates of birth, likes and dislikes. For example, Melba the bunny liked having blackberry tea and munching a scone in her garden. We took a group picture (minus Pip the sheep, unborn at photo time) before they were distributed during the party, to be discovered through scavenger hunt clues! So fun!


During the summer miss M renewed her interest in beading. My sister started her off with a birthday beading day just with her cousin, and she made these two gorgeous bracelets!


Pleased with her new bling, this spurred her on to make beaded gifts for her friends' birthdays, using beads from my old jewellry cast-offs, and a couple of stores here and there. The first picture below also features a blue sheep miss M needle felted. He is eyeing the blue and green beaded necklace with the initial T.


Creating beauty. It's a wonderful thing!

Friday, November 5, 2010

Thursday, November 4, 2010

New Project Bag!

I love packages in the mail! Who doesn't, really. This one wasn't in brown paper, or tied up with string, but oh so delightful.

My latest acquisition, all ready to be fed some alpaca/merino.


(it's from here!)

Saturday, October 30, 2010

Autumn

misty morning


that's toast


pumpkin yummies


what we have

Thursday, October 21, 2010

Tis the season

for keeping hands/arms/wrists warm!

I love making fingerless mitts. Fast, practical, fun to give away.

By Ysolda Teague, her Garter Stitch mitts


And my favourite pattern is by Clara Parkes, Maine Morning Mitts


For the gift reserve.

Tuesday, September 28, 2010

Ultimate soft

Sometimes it's nice to keep a cosy layer about the neck, without the cumbersome-ness of a scarf.

This was instant gratification.

Saturday, September 18, 2010

Blanket Love

Our group project is done. It turned out SO well, what a beautiful combined effort by everyone.


I'm really happy with the corners:


My I-cord join is not perfect, you can see it next to Lukey's left paw. Let's just say Kitchenering a tube is not the same as the toe of a sock.


This is for Sarah.

Friday, September 17, 2010

Blanket Border

After the seaming (this is the BACK of the seaming - looks fairly neat with ends woven in)


....we had to decide on the border. What to do? I asked around at work, I talked about it to anyone who would listen to me.... everyone graciously deferred to my judgement. Ack! Garter border? Garter border with eyelets? Applied I-Cord? Picot edging? Crocheted edging?

Back to ravelry and googling. I dithered and pondered and experimented.

Applied I-Cord was my final choice since it is very sturdy and gives a very nice clean finished look to garter edges. I HAD planned on picking up one-half stitch along each garter ridge (as in the tutorial linked below), but I found the picked up stitch was not sitting comfortably on the needle....I did not want to work my SSK with it like that, so I sat back, deflated a bit. I dwelled on it overnight before my eureka moment. At work we decided to have a violet border, so using this, I picked up sts all along one side. Then, working from the other end of the ball, began working a 4-stitch applied I-cord from where I started to pick up.


I don't a have a photo of how I started, but here's the link that got me going. It uses a provisional cast on.

Here's what I did when I turned the corner.


Then I used kitchener stitch to join it together.


One more final wash before it's ready!

Saturday, September 11, 2010

Before it rained

The chairs got stained, just in time!


They perk up the backyard, great contrast to the green (and brown)


Pink hydrangeas in full out bloom!