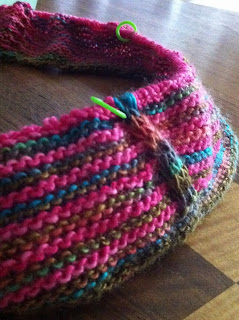
Jane Richmond's Oatmeal proved to be as simple and comforting as the design name implies.
Add to it the use of Malabrigo Chunky (Paris Night), and the yummy factor got kicked up significantly!
Took less than a week from start to finish, what a joy to knit.
Details on ravelry!
Satisfaction in five skeins, my friends.
Friday, December 9, 2011
Thursday, November 17, 2011
Goes like clockwork
Aptly named, this scarf went without a hitch.
Easy hockey knitting!
Made of Handmaiden Mini Maiden (50% silk, 50% wool), one skein each of raspberry, and cezanne.
Lots of leftovers for another one down the road.
(sorry for the bathroom shot, but the lighting seemed good)
Easy hockey knitting!
Made of Handmaiden Mini Maiden (50% silk, 50% wool), one skein each of raspberry, and cezanne.
Lots of leftovers for another one down the road.
(sorry for the bathroom shot, but the lighting seemed good)
Sunday, October 30, 2011
Hair of the Mo
I used to think mohair was from something called a "mo." It took me quite awhile (ie. up til a few years ago) to finally figure out that the yarn is made from the hair of an Angora goat. Not to be confused with angora wool, which is made from the fur of an Angora rabbit!
At any rate, I love this warm and fuzzy stuff!
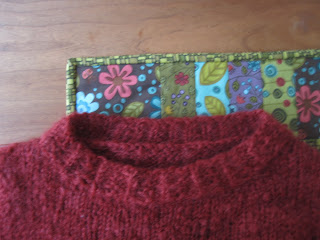
The pattern is from Vogue Knitting 2010/2011, a standard-fitting pullover. It is written for a cowl neck, where the cowl is knit for 8 inches in rib, and sewn on separately to the neckline of the sweater. It is then supposed to be folded in half so that it ends up being 4 inches doubled. I thought I would not fold it, but let it lie in gentle soft folds instead. Turns out I got very bored at the 5 inch mark so I cast off, then sewed it onto the sweater. Unfortunately the single layer of fabric did not sit well, so I tried folding it to the inside. I was told by my teenaged daughter that it looked like the ruffle of a clown.
So I ditched the whole cowl idea and instead picked up 60 sts around the neck, worked about 5 rounds in rib, then cast off in pattern! This works for me.
Other modifications include omission of the patch pockets (they looked like hip pads on me), and I did not turn up the hem. The turning ridge is still present, but I have now decided that it is a "design element."
It's a perfect fall sweater. Details on ravelry!
Saturday, October 1, 2011
Happy Panda
Monday, September 19, 2011
Saturday, September 17, 2011
Clothilde
We were in Ashland, Oregon this summer and I happened to see a knit shop right in our walking path!
What luck. (It's the one with the red awning)
Beautiful store with lots of charm (and air conditioning - it was about 35 degrees Celsius outside), miss M and I found plenty to keep us occupied whilst the boys traipsed about in the bookstore next door.
We found a few treasures:
Madelinetosh dk in the colourway Ink.
A panda tape measure by Lantern Moon.
And of course the monkey needle felting kit, as you saw in the last post.
It was one of those purchases when you see the yarn, you quickly find a pattern, and you're off and running.
Meet Clothilde, a triangular shawl knit in dk weight.
Great stockinette sections to show off the varigations.
A fairly quick knit (when you are actually knitting), I do love lace on heavier weights. I made the large size, the final dimensions are 72" wingspan, and 32" deep. I had been hoping to make it on two skeins, but ended up using about 10 percent of a third.
Total estimated yardage 473 yards. A cosy shawl or scarf, I love it.
Thursday, September 15, 2011
Monkey See, Monkey Do
Way back in the spring time, I found a little sock monkey kit to knit at Urban Yarns!
It was so cute I bought it without a second thought.
The result was okay, I wasn't thrilled with how the face turned out, but you could still get the idea.
I moved on.
While travelling this summer, miss M found a sock monkey kit to needle felt at Websters!
Happy to encourage creativity in the family, I bought it immediately.
The result was fantastic! We love it!
The sock monkey pals, hanging around the house.
Friday, July 29, 2011
Thursday, July 21, 2011
Leaves, mon amie
Last year I came across a shawl pattern that caught my eye, called Photosynthesis by Modern Lace. The name appealed to the science student in me, not to mention the delicate repeating leaves! I bought the pattern to add to my collection.
Later in the year, I fell in love with a beautiful green laceweight yarn by sweet georgia yarns, the colourway called Botanical. The greens had subtle varigation, and were extremely restful on the eyes. I had to have it, and felt very content just looking at the skein from time to time as I moved it around the house to appreciate it in different light.
Then one day pattern and yarn lay side by side, and a new idea was born!
Seems pretty obvious to me now, gah.
Photosynthesis + botanical = perfect pairing.
Once I got into the zone, the shawl worked up very well in about four weeks.
The pattern was a treat to knit! Very well written, with an excellent cast off for no-worry blocking stretchability!
The yarn is sheer beauty (as are all of sweet georgia's!)
I knit on my lace beauty, immersed in the joy of watching the leafy lace pattern emerge and change as I made my way through the charts. I admired the little leaves, I anticipated the transition rows, I embraced the big leaf section because they added balance. I loved making the lacy mesh edge, but then it was all over too soon. I was sad it came to an end, but so happy and pleased with what I had accomplished.
Lila, this shawl is for you!
Thank you for all the wonderful times we've shared over the years, but mostly, thank you for your kind and generous friendship.
You will be missed very much, miss millefeuille!
Love, miss eclair
Tuesday, July 19, 2011
a little card, a little envelope
Monday, July 18, 2011
Valise
I enjoyed a new challenge recently. A vintage brown leather portfolio came across my path! It has a very simple design, slim profile, and sturdy zipper. There are some surface scratches from regular use, but the leather is in excellent shape. Over time, though, the stitches have shown their age: in the area where they attach the zipper to the case itself, they had worn thin, frayed, and disappeared. This meant I got to try my hand at leather repair!
First I went looking for the right kind of thread. I found a great colour match with the leather:
and the existing stitch colour, too.
Ideally I wanted to use a strong quilting thread, but the shop was in short supply of colour selection in the thread I wanted, at the time. Instead, I used my usual silk finish cotton thread. I doubled it to get a closer match to the weight of the other stitches.
Then I set about carefully unpicking the remains of the stitches on the underside of the zipper.
Then I got to start making stitches! I backsititched my way through sections where no stitches remained, admiring my work along the way. It was pretty easy considering I did not have to make holes in leather, I just worked the needle through the path that was already broken. I found this "work" to be very satisfying.
It all went swimmingly! I think the hand made stitches look pretty comfy nestled into their places.
Monday, June 20, 2011
Anyone for dessert?
Monday, April 25, 2011
Pillow Talk, Set 2
Sometimes I will just be puttering about the house, minding my own beeswax, then all of a sudden get struck by a creative idea where anything I am doing at the moment must stop so that I can make whatever it is that instant.
When the idea is a simple one of making pillows using up scraps on hand, things go together pretty quickly ie. no shopping involved! I completely forgot to take "before" photos, but here are a couple of "afters."
This pillow was made using some old jeans I bought for a few dollars many years ago at a consignment store. The jeans were crazy looking, but I thought they would come in handy to use for something. The fronts of each leg were pieced with vertical strips of fancy fabric, alternately with denim. If you have ever cut up jeans before, intending to use them as big flat pieces of material, you will agree that it does not work that well unless you use smaller pieces, which is what I did. I used a small portion of the front of each leg, pieced them together to make the front of the pillow, and then used some cotton from my stash for the back. Voila! The pillow form is a very old bed pillow. The stuffing had decreased somewhat, so I just pushed it down to one end and sewed a new seam so the resulting pillow size is about 18 x 20 inches. I like my upcycled pillow!
I ran out of jeans to cut up for a second pillow, so I turned to my collection of embroidered and cross stitch table linens, picked up over the years from thrift stores and garage sales. The top half of this pillow was cut from a little runner that was stained in one section. I used the good part, incorporated some of the original lace edging, and combined it with a garden/bird print for a splash of more colour. I thought the bare spot under the arc of the embroidery could do with some text, so I penned in the word, "Bliss," because that's the feeling I have when I create something beautiful (yes, then truly that feeling would be "blissful," but the noun works better in this case, thank you). Love x 3!
Wednesday, April 20, 2011
Pillow Talk, Set 1
This year, I've been making a concerted effort to make my bed every day. Never used to be a priority, but lately I have noticed the pleasure I have when I walk into my room and see the bed all neat and tidy. It's satisfying, and adds a degree of serenity to my day when I look at it.
A new duvet cover helped a lot, I admit, to ensure my daily task gets completed. A beautiful indigo blue, all cotton, from India, but I thought I would add some light coloured square (25" x 25") pillows to brighten and balance the blue and green (sleeping pillows) from the gorgeous cherry headboard.
I picked up some cotton muslin from IKEA (as well as the pillows) to put together a simple pillow cover. To dress it up a bit, I looked through my button collection for inspiration.
On the front of the pillow, I plotted out a 3 x 3" square in the centre of one side, and reinforced the back with foundation paper applied with fusible web to make a sturdy sewing surface.
Then I sorted out buttons, and on the reinforced 3x3 square, I sewed the reds onto one pillow cover:
and on the other pillow cover, the yellows (with some gold):
And here we are, my made bed, complete with button-embellishments!
Subscribe to:
Posts (Atom)